【转载】vue3中优雅地呼出弹窗对话框——纯JS调用式阻塞弹窗对话框实现
原作者:锦恢
原文链接
为什么要纯JS调用的阻塞式对话框?
最近在开发网站时,突然觉得之前设计的密码弹窗的内部实现不够优雅,因为每次在一个page下设置一个密码对话框,都需要先在 <template>里面写好一个<teleport to="body">,然后在setup中定义几个用于控制和处理事件的函数与方法,就像这样:
 <template>
     ......
     <teleport to="body">
         <dialog v-model:showDialog="show"><!-- 自定义对话框组件 -->
             <input type="text" v-model="password">
             <button @click="confirm">确认</button>
             <button @click="cancel">取消</button>
         </dialog>
     </teleport>
     ......
 </template>
 <script setup>
 import { ref } from "vue";
 const show = ref(false);
 const password = ref('');
 function confirm() {
     ...
 }
 function cancel() {
     ...
 }

 </script>
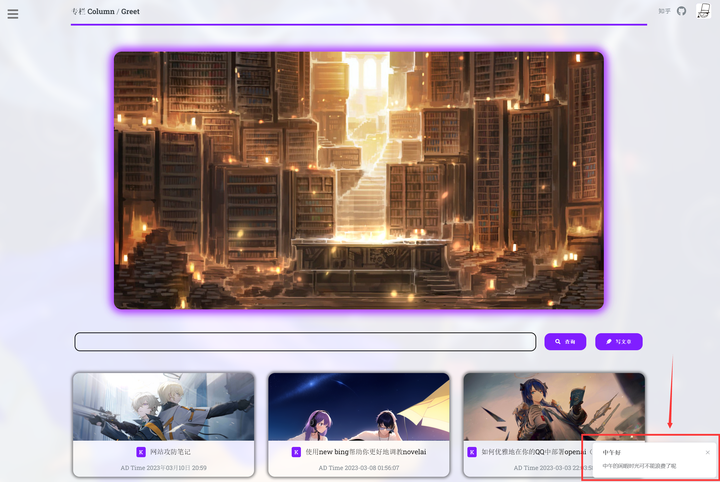
每次都需要这么写,在一个功能众多的页面中,未免显得太繁琐了,而且还会增大后期管理的难度。在element-plus中,就提供了纯JS函数的调用方法来生成一些临时组件,比如,我最常用的ElNotification,不需要定义html和css,只需要调用一个函数,就能直接弹出一个弹框:
 // 弹出一个存在时间为3000ms的弹窗
 ElNotification({title: "中午好", message:"中午的闲暇时光可不能浪费了呢", duration: 3000});
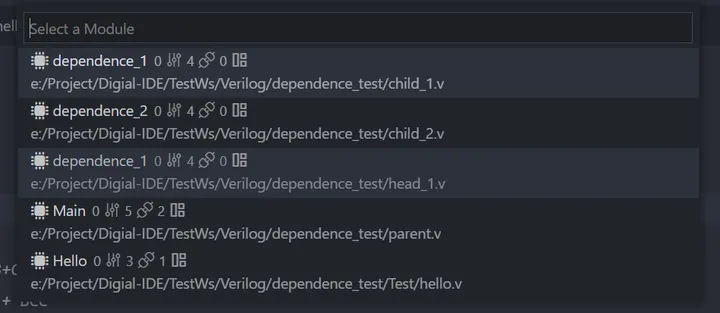
再比如,在vscode插件开发中,你只需要调用如下的函数,就能展现出一个选择框,让用户选择:
const select = await vscode.window.showQuickPick(items);
代码执行到这句话时,便会阻塞,在用户界面弹出一个对话框,直到用户输入并点击“确定”后,await才会返回用户选择的结果(如果用户没有选择,则返回undefined)。而我们可以通过传入参数来控制生成的窗体的样式和内容。比如我参与开发的Digital-IDE中的自动例化,就调用了vscode.window.showQuickPick来让用户选择要例化的模块:
这样的做法毫无疑问,比上面维护几个函数和临时变量诞生的屎山代码来得强。
实现纯JS调用阻塞式对话框
创建对话框模组
那么,要如何实现一个这样的在外部只需要通过JS代码就能调用的阻塞式对话框呢?首先,我们当然需要先写好一个对话框的vue模块:
 <template>
     <transition name="fade">
         <div class="input-box-wrapper" v-show="show">
             <div
                 class="dialog-box"
                 :style="`height: ${dialogHeight};width: ${dialogWidth};`"
             >
                 <div class="dialog-header">
                     <div class="password-title">{{ title }}</div>

                     <div>
                         <div class="little-close" @click="confirm(undefined)">
                             ×
                         </div>
                     </div>
                 </div>

                 <hr />

                 <div>
                     <div style="width: 100%">
                         <input
                             type="password"
                             class="my-input password-input"
                             v-model="password"
                             @keydown.enter="confirm(password)"
                         />
                     </div>
                     <br />
                     <div class="dialog-btn-wrapper">
                         <button
                             class="primary password-btn"
                             @click="confirm(password)"
                         >确定</button>
                         <button
                             class="primary password-btn"
                             @click="confirm(undefined)"
                         >取消</button>
                     </div>
                 </div>
             </div>
         </div>
     </transition>
 </template>

 <script>
 import { computed, ref, onMounted } from "vue";

 import { showInfoWindow } from "@/hook/window";

 export default {
     name: "PasswordDialog",
     props: ["height", "width"],
     setup(props) {
         const dialogWidth = computed(() => (props.width ? props.width : "30%"));
         const dialogHeight = computed(() =>
             props.height ? props.height : "auto"
         );
         const show = ref(false);
         const title = ref("请输入密码 Password");
         const password = ref("");

         onMounted(() => {
             document.addEventListener("password-dialog-show", (event) => {
                 show.value = event.detail.show;
                 title.value = event.detail.title ? event.detail.title : "请输入密码 Password";
             });
         });

         function confirm(password) {
             if (typeof password == 'string') {
                 password = password.trim();
             }
             if (password === "") {
                 showInfoWindow("输入不能为空!");
                 return;
             }

             const event = new CustomEvent("password-dialog-confirm", {
                 detail: { password },
             });
             document.dispatchEvent(event);
             show.value = false;
         }

         return {
             title,
             dialogHeight,
             dialogWidth,
             password,
             confirm,
             show,
         };
     },
 };
 </script>

 <style>
 hr {
     width: auto;
     margin: 50px;
 }
 </style>
- 上面提到的CSS我会附在文章末尾
vue->虚拟节点->真实节点->挂载DOM
然后问题就来了:既然我们要通过纯JS代码来调用一个模块,那么自然需要通过JS代码来把vue模块创建对应的虚拟节点并挂载到实际的DOM上,这篇文章我不想花太多时间来讲解vue3的内部原理,感兴趣或者不明白的同学可以在评论区留言,我来给你补课。
我们可以通过vue提供的几个基础渲染函数来将一段.vue文件导入并渲染成真实节点:
 import { defineAsyncComponent, render, createVNode } from "vue";

 const component = defineAsyncComponent(() => import("@/components/Dialog/password.vue"));
 const props = { width: "30%", height: "auto"};

 // 创建虚拟节点
 const dialog = createVNode(component, props);

 // 创建用于渲染虚拟节点的真实节点
 const container = document.createElement('div');

 // 将虚拟节点挂载渲染到真实节点上
 render(dialog, container);

 // 保存一下虚拟节点和真实节点实例
 const vnode = dialog;
 const node = container.childNodes[0];

 // 将已经实体化的虚拟节点挂载到DOM上
 document.body.appendChild(this.node);
通过上述代码,我们就能做到仅凭JS代码,不去动HTML,将vue挂载到DOM上。
那么,我们要如何让JS函数去和vue虚拟节点通信,从而控制对话框消失或展示,或者传递过来用户输入的数据呢?其实在上面的vue代码中已经剧透了,那就是通过DOM原生的两个事件函数:
 // 触发事件e,其中e的属性detail可以用于传递任意类型的参数
 document.dispatchEvent(event);

 // 监听事件,第一个参数为事件名,也就是e的名字,第二参数为e的回调
 document.addEventListener(eventName, callback)
DOM内部执行监听事件基于事件表执行,效率很高,只是为了一个对话框创建两个event和listener问题不大。
我们需要两组事件,一组用于让JS函数控制dialog展示或消失,一组用于让dialog把用户的响应返回给JS函数,然后再传递给应用层代码去操作。
简单包装一下
简单包装一下,我们有如下的代码:
 import { defineAsyncComponent, render, createVNode } from "vue";

 class PasswordDialog {
     constructor() {
         this.component = defineAsyncComponent(
             () => import("@/components/Dialog/password.vue"));
         this.vnode = null;
         this.node = null;
         this.props = {
             width: "30%",
             height: "auto",
         };
     }
     install() {
         if (!this.vnode) {
             const dialog = createVNode(this.component, this.props);
             const container = document.createElement('div');
             render(dialog, container);

             this.vnode = dialog;
             this.node = container.childNodes[0];
             document.body.appendChild(this.node);
         }
     }
     /**
      *
      * @param {string} title
      * @returns {Promise<string>}
      */
     show(title) {
         // 发送信号,显示窗口
         const event = new CustomEvent('password-dialog-show', { detail:
             { show: true, title: title }
         });
         document.dispatchEvent(event);

         return new Promise((resolve) => {
             document.addEventListener('password-dialog-confirm', event => {
                 const password = event.detail.password;
                 resolve(password);
             });
         })
     }
 }

 const passwordDialog = new PasswordDialog();

 /**
  * 展示一个阻塞式对话框
  * @param {string} title
  * @returns {Promise<string>}
  */
 export async function showPasswordDialog(title) {
     return passwordDialog.show(title);
 }
找时机安装
诸位可能发现了,我把vue->虚拟节点->真实节点->挂载DOM的过程写在了install函数内,为什么不直接写在类的构造函数内呢?很简单,因为当我们的vue项目启动时,整体的DOM还没有渲染完成,你是无法在没有渲染完DOM的情况下挂载你的节点的,所以我们必须把这个class的install在何时的时机进行触发,也就是所谓的安装了。
那么,在哪里去安装呢?我是选择在main.js下安装:
import { installDialog } from "@/hook/window"
createApp(...)
...
...
...
installDialog() // 这个函数是所有对话框安装的集合
- 为什么不在show函数内部再去判断然后安装呢?因为来不及,会错过第一次让show为true的事件传递。
下面就开始愉快地使用吧!
使用
 // 提交修改版本的
 async function publish() {
     const password = await showPasswordDialog("请输入密码");
     if (password === undefined) {
         // 说明用户点了取消
         return;
     }

     // 发送密码和修改请求,等待服务器响应
     const res = await reqModifyBlog(password, ...);
     // 后续处理,包括密码不正确
     ...
 }
看一下效果
热门推荐
-
 浏览(104)
 -
 浏览(80)
 -
 浏览(78)
 -
 浏览(77)
 -
浏览(77)
关于我
